Summary
Here is a brief overview of the simple steps you need to perform to connect LinkFixer Advanced to your Box enterprise (described in detail after this summary):
- Have Box Support enable the “Developer” add-on in your Box account. This way Box will let you create a custom Box “app” which you will use to connect Box to LinkFixer Advanced.
- Create a custom “app” in Box. This is the way to connect Box with LinkFixer Advanced.
A custom app in Box is really just a connector with a few settings. You can create one in about five minutes. - Enable two-factor authentication in Box. This results in an increase in your custom Box app's security. Box requires you to do this before it will provide you with the Client Secret, which you will use to connect LinkFixer Advanced to your custom Box app.
- Ask Box Support to set give your custom Box app the Global Content Manager (GCM) scope. Box Support usually gets this done the same day you request it.
- Set up a connection to that Box app in "Network Locations" in LinkFixer Advanced by pressing {Add...} | Box... That window is called "Configure Box". This is also super easy. It just takes a couple minutes.
Once you’ve successfully performed the steps above, you will be able to run LinkFixer Advanced on your Box files and links.
1. Locate the Box Developer Console on Box.com.
If you don't already have it enabled, have Box Support enable the “Developer” add-on in your Box account. This way Box will let you create a custom Box “app” which you will use to connect Box to LinkFixer Advanced.
1. Log into your Box administrator account.
2. Go here: https://app.box.com/developers/console
3. If the Box account you are logged into has the Box Developer Console enabled, you will see something like this:

If you don't see those options, then you should see a sign up form. Fill out the form in order to have Box Support enable the Box developer account extension for your Box admin account.
If that doesn't work for any reason, open a Box Support ticket and ask them for help enabling your Box developer account extension.
2. Create a custom Box app.
This is the way to connect Box with LinkFixer Advanced.
A custom app in Box is really just a connector with a few settings. You can create one in about five minutes.
1. Once you have your Box Developer Console working, click {Create New App}.
2. Click on {Custom App}.

3. Give your app a friendly name. We suggest something like "LinkFixer Advanced Connector".

4. Choose "Server Authentication (Client Credential Grant)".
Warning: Server Authentication (Client Credentials Grant) is the only authentication method suitable for use with LinkFixer Advanced. Do not use any other authentication method for this custom Box app.

5. Click {Create App}.
6. You should now be on a page with the name you gave your custom Box app (like "LinkFixer Advanced Connector"). The top of that page looks like this:

7. Scroll down to the "OAuth 2.0 Credentials" section.
8. Copy the "Client ID" value and save it for later. We suggest you save this in a text file, Word document, or Excel spreadsheet.
9. Scroll down to the "App Access Level" section.
10. Click on "App + Enterprise Access". (The default, "App Access Only," is insufficient.)

11. Scroll down to the "Application Scopes" section.
12. Make the selections (items checked on and checked off) as shown in the following screenshot:

13. Scroll down to the "Advanced Features" section.
14. Make the selections (items checked on and checked off) as shown in the following screenshot:

15. Click {Save Changes}. You've created your custom Box app! Now you need to activate it.
16. Click on {Back to My Account} at the bottom of the black "Developer" sidebar:

17. Now click on {Admin Console} near the bottom of the blue "Box" sidebar.

18. Click on {Apps} in the black "Admin" sidebar:
 19. Click on the "Custom Apps Manager" tab.

20. Click on {Add App}.
21. Paste in the "Client ID" you saved in an earlier step. You will be presented with a summary of your custom Box app's configuration. In this screen shot we have redacted our Client ID. You will see your app's Client ID:

22. Click {Authorize}.
23. Your custom Box app will now show up in the Custom Apps Manager list:

This results in an increase in your custom Box app's security. Box requires you to do this before it will provide you with the Client Secret, which you will use to connect LinkFixer Advanced to your custom Box app.
1. Go here: https://app.box.com/account/developer
2. Scroll down to the "2-Step Verification" step. (Box sometimes calls this "two factor authentication" and sometimes "2-Step Verification".)
3. Click {Set up} under "2-Step Verification":

4. From here, follow the steps in Box. You can use a Box-supported authenticator app, or you can use SMS messages. This is completely up to you. When you are done setting it up, it's time to go fetch your Client Secret.
5. Go here: https://app.box.com/developers/console
6. Click on your custom Box app.
Hint: You may have named it "LinkFixer Advanced Connector".
7. Click on the "Configuration" tab.
8. Scroll down to the "OAuth 2.0 Credentials" section.
9. Click on {Fetch Client Secret}.
10. Follow the two-factor authentication steps. You'll be sent back to the Configure tab when you are done authenticating.
11. Press {Fetch Client Secret}. (Yes, you're doing this again. This time it will make the "Client Secret" field appear.)
12. Copy your Client Secret. Save this someplace very safe.
Security Tip: Do not share your Client Secret with anyone outside your organization. LinkTek Support will never ask you for your Client Secret. We don't need it. You will need to enter it into LinkFixer Advanced later on, to connect it to your custom Box app. You are responsible for the security of your Client Secret.
Now let's go get your Box Enterprise ID.
13. Go here: https://app.box.com/master/settings/accountBilling
14. Scroll down to the "Account Information" section.
15. Copy your "Enterprise ID". Keep it with your Client ID and Client Secret.
4. Ask Box Support to give your custom Box app the Global Content Manager (GCM) scope.
Box Support usually gets this done the same day you request it.
1. Open a support ticket with Box using your Box admin account.
Note: The best way to reach out to Box depends on your Box service tier and also what country you are in. Here's a good place to start: https://support.box.com
2. In your support ticket, ask them to enable Global Content Manager (GCM) scope in your custom Box app. You may have named this "LinkFixer Advanced Connector".
Box Support will probably want:
- The app's Client ID
- Your Enterprise ID
They should not need your Client Secret. Do not share your Client Secret.
Tip: If you ever create a different custom Box app for use with LinkFixer Advanced for some reason, you have to get Box Support to give that new app GCM scope. The GCM scope is per-app, not per-enterprise.
Once Box Support replies telling you they have enabled Global Content Manager (GCM) scope in your custom Box app, you are now ready to connect LinkFixer Advanced to your custom Box app!
5. Connect LinkFixer Advanced to your custom Box app.
This is also super easy. It just takes a couple minutes.
1. Open LinkFixer Advanced.
2. Go to ☰ | Network Locations.
3. Click {Add...} | Box... This will open the Configure Box Connection window:
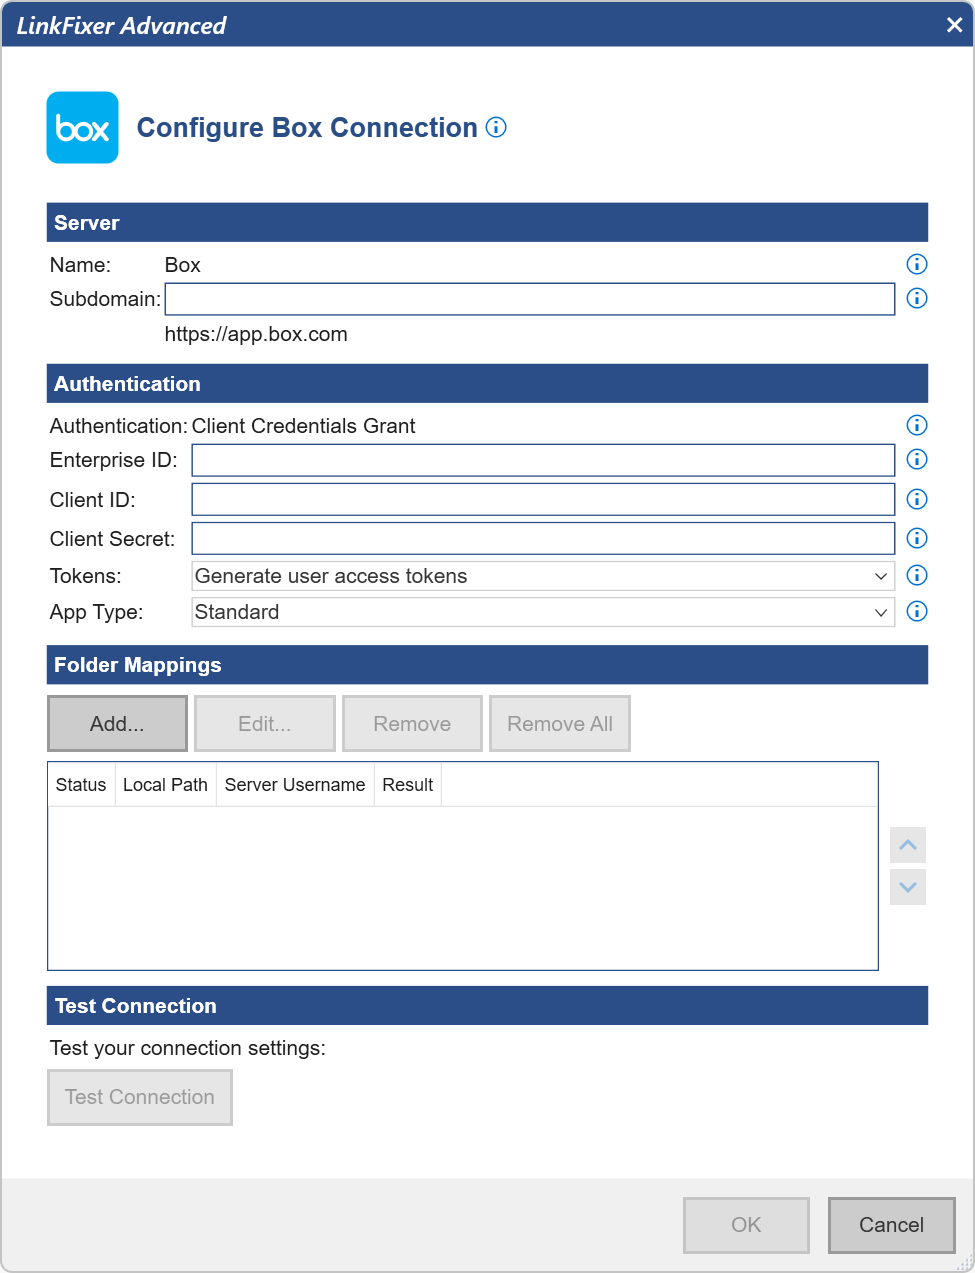
4. Enter your Box enterprise's Box subdomain in the "Subdomain" field. This is the "mycompany" part of "mycompany.app.box.com" in your Box URLs.
The subdomain is a somewhat optional thing in Box. If you get the subdomain wrong on your links, they still work in many, many Box situations.
Much like Box itself, no validation whatsoever is performed by LinkFixer Advanced in this window or elsewhere regarding the Box subdomain. So please type it correctly here. And please update it here if you change it in your Box enterprise.
Whatever subdomain you define here could potentially end up being used in your Box links after processing them with LinkFixer Advanced. This depends on your LinkFixer Advanced Box settings.
5. Enter your Box Enterprise ID.
6. Enter your custom Box app's Client ID.
7. Enter your custom Box app's Client Secret. Again, do no share your Client Secret with anyone who you don't want to have access to the files in your Box enterprise.
8. Press {Test Connection}. If LinkFixer Advanced is able to authenticate with your custom Box app using the credentials you have provided (Box Enterprise, Client ID, and Client Secret) then you are almost done!
9. Don't change the "Token" value.
10. Change "App Type" to "Global Content Manager (GCM)".
11. Optional: Define folder mappings.
12. Press {OK}.
You have now connected LinkFixer Advanced to your custom Box app, so you can now process links in your Box enterprise! Congratulations!